For a quick overview of Opiq
Teachers and pupils can access the digital textbooks through the school's Opiq account, which is managed by an administrator in each school. Schools have the possibility to purchase packages, for more information click here.
Additional information can be requested by writing to info@opiq.co.ke or by calling +254 205 148 194 (Mon-Fri from 9:00 am to 5:00 pm). Also, check announcements on our Facebook page.
Create a user account
A teacher's Opiq account is created by school based Opiq administrator using teacher’s email address. To do this, the school administrator sends an invitation to the teacher's email address, which becomes the Opiq login. Read more about it from user guide to school administrator.
The invitation contains a link which will take the teacher to a page where he or she can set a password. From then on, they can log into Opiq by going to https://opiq.co.ke and entering their username and password.
Note: The invitation is valid for seven days. If, during this period, the teacher has not clicked on the link to set a password, the school administrator must resend the invitation. The invitation is valid once - once a password has been set, the same link cannot be used to set a password again. If there is need to reset the password, the school administrator needs to be contacted.
Log in
Opiq account is created using an email address.
Also see creating a user account
Log in like this:
- Go to https://opiq.co.ke and click on the Opiq logo.
- When the login window opens, enter your email address in the "username" field and your password in the "password" field.
- Click on the "Log in" button.
- The Opiq dashboard opens, and you can start using the digital materials right away.
- If it is a publicly used computer, do not leave yourself logged in.
Teacher’s dashboard
After logging in the dashboard view is divided into three blocks. Starting from the left, the blocks are: tasks, courses and Opiq shortcuts.
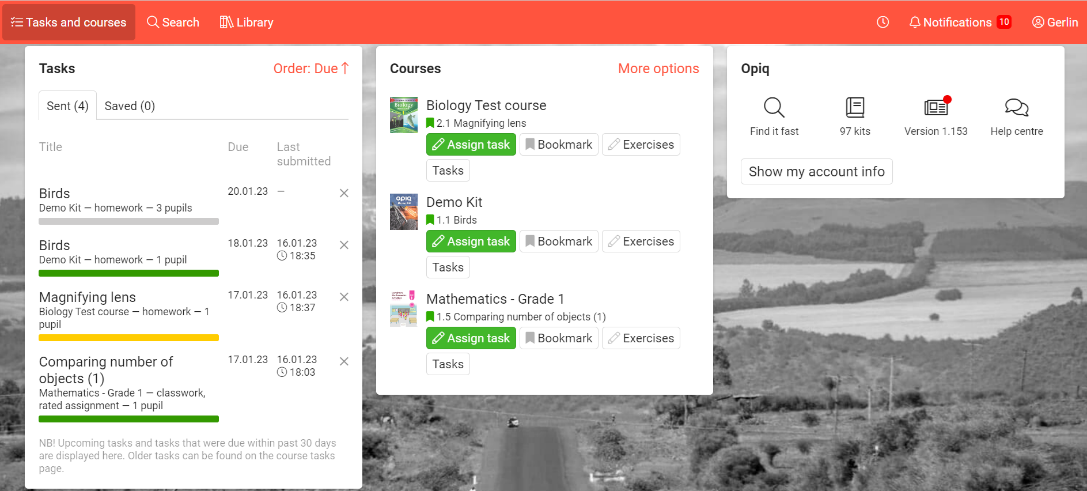
The top menu bar of your teacher account has the following buttons:

- Tasks and courses: clicking on the icon opens the user's dashboard, regardless of which Opiq page the user is currently on.
- Search: Opens the search page.
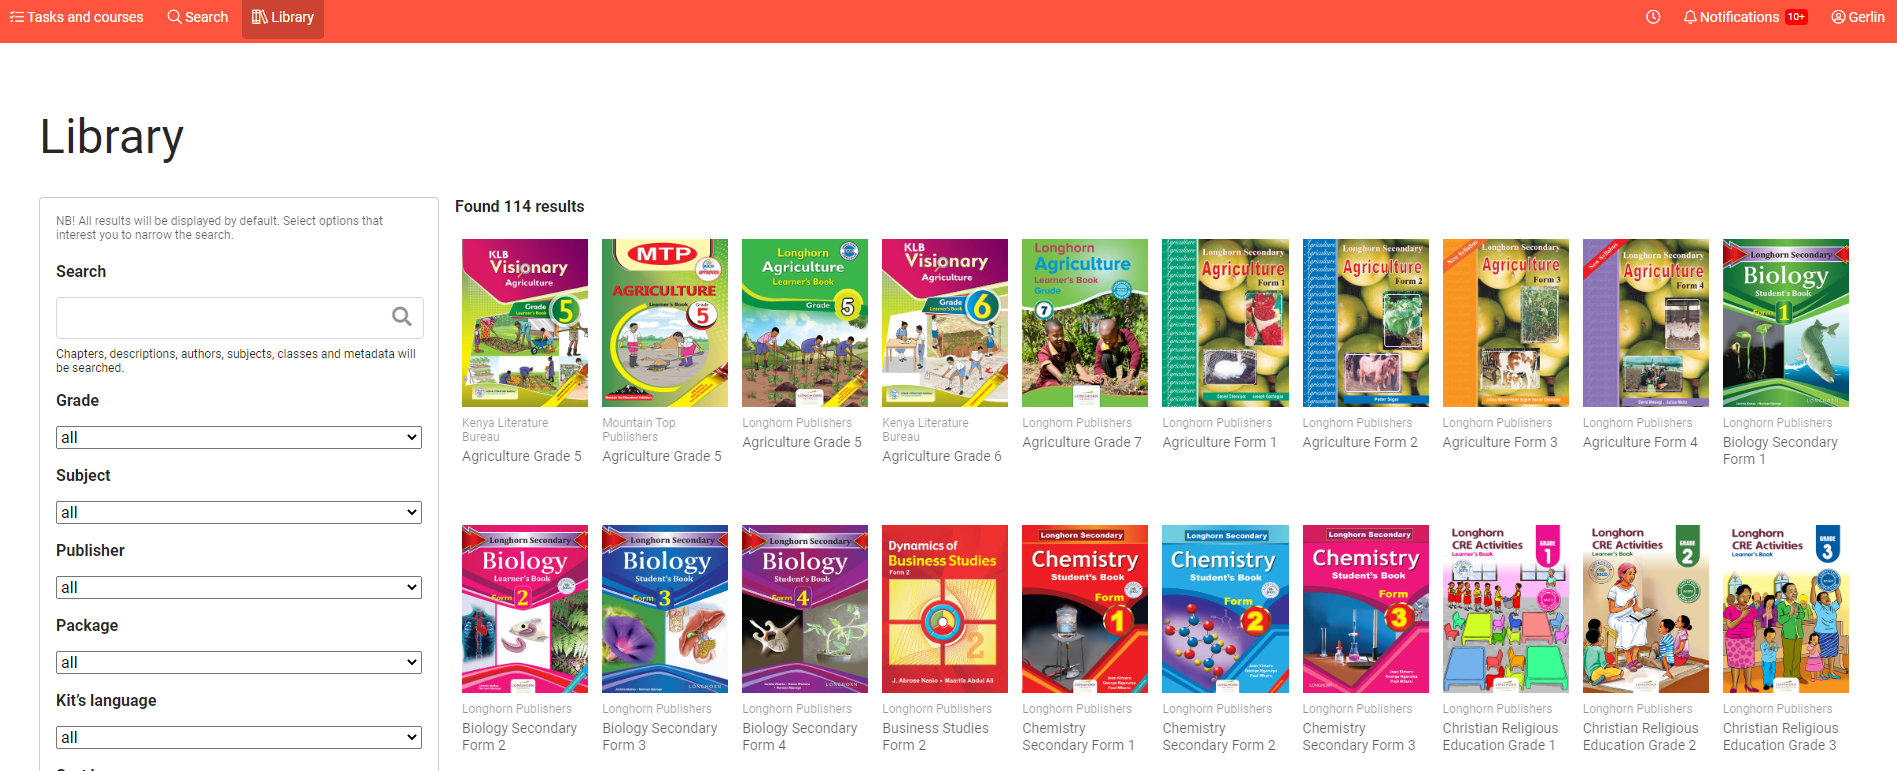
- Library: overview of all digital textbooks in Opiq.
- Clock icon: opens the clock, timer and stopwatch. You can use this for timed work during class. To stop and close the timer and the stopwatch, click on the "x" button.
- Notifications: Here you find notifications such as when pupil requests to unsubmit the assignments he/she has already submitted.
- Profile icon and name: settings, orders, licenses etc. If you have several roles in Opiq you can change roles and/or log out from Opiq.
Opiq shortcuts
This Opiq block on the dashboard provides the user with useful shortcuts, for example, to the library and to user guides page.
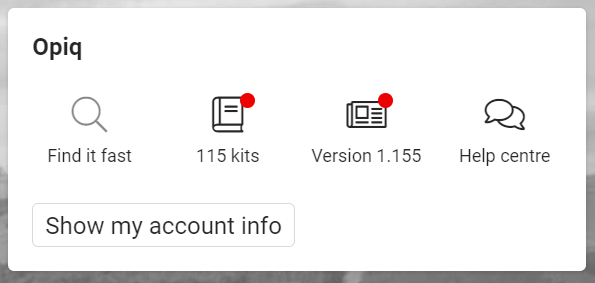
- "Find it fast" takes you to the search page.
- Book icon. When new digital books are added, a red dot appears on the icon. Clicking on the icon will take you to the library, the most recently added digital textbooks will automatically be shown at the top of the page in this view.
- Version short cut is a link with a version number that leads to the Opiq platform upgrade list page. A red dot will appear on the icon when the version number is updated.
- "Help Centre", which will take you to the user manuals page.
- "Show my account details" - Clicking on this button will show the user the currently logged in user and their institutional affiliation.
Library and study kits
Teacher who is logged into Opiq has access to all the study kits in the Opiq library that are part of the teacher license package.
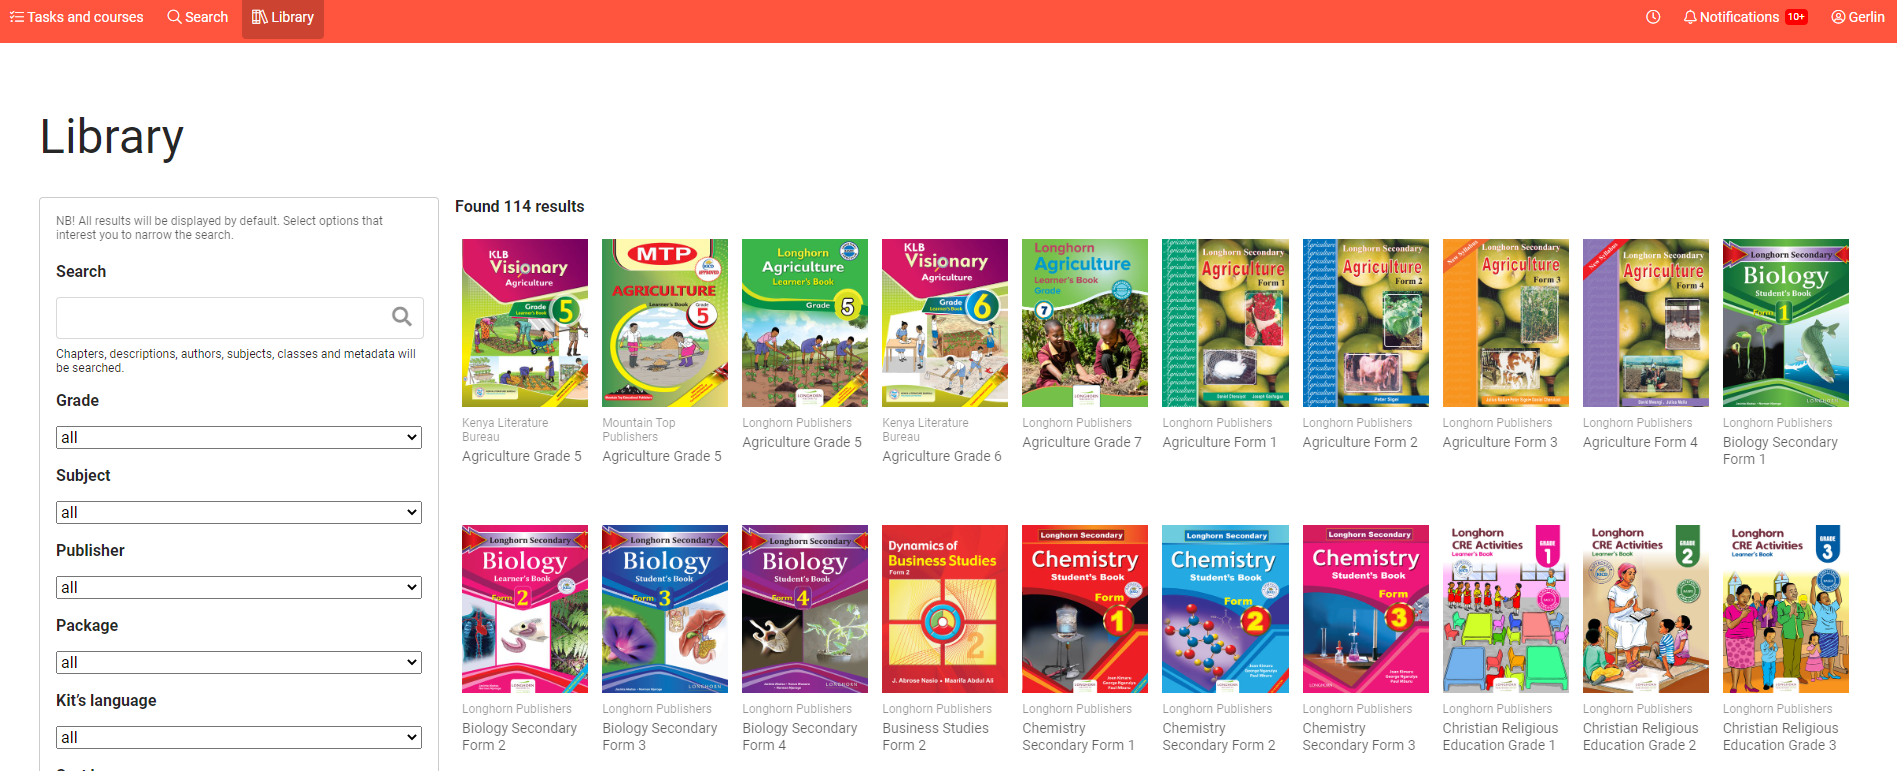
Study kit is the material found in the library. Study kit is digitalized textbook. They can be recognised by the cover pages as they are identical to the print books. Study kit is a complete course for one learning area/grade, corresponding to paper based textbook and workbook set. It consists of chapters from the textbook and a set of tasks. A learning area can include several study kits.
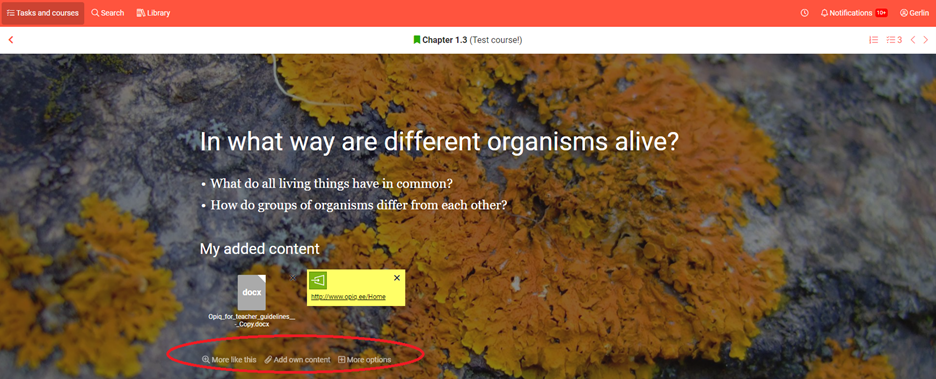
In the chapters of the study kit, the teacher can add his/her own material, which can also be seen by the pupils who belong to the course to which the study kit is linked. Clicking on the “More like this” link will display links to sections in the same or other study kits, covering similar learning content. This allows the teacher to find exercises and materials of varying difficulty on the same topic to incorporate to meet the needs of different learners abilities. Clicking “add own content” it’s possible to share your own material there and pupils will see it in their digital textbook.
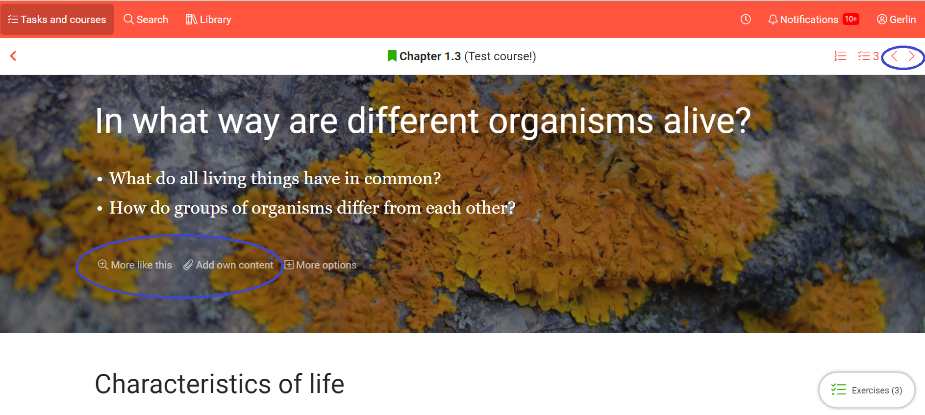
There are links to the previous and next chapters in the top right-hand corner of the chapter.
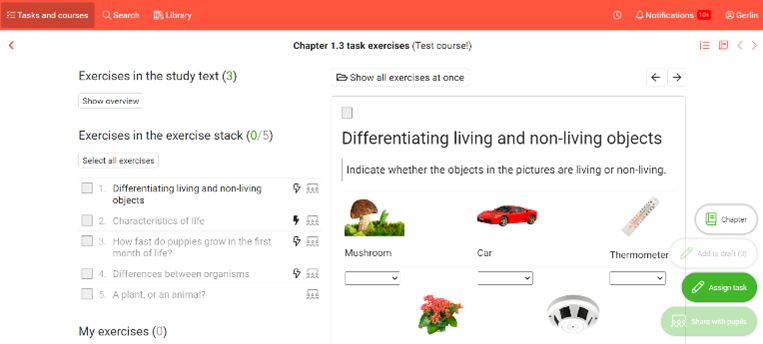
Exercise stack is an assessment items bank that the teacher has access to and can assign exercises to the pupils. When exercise stack exercises are assigned to the pupils, pupils can not check if the answer is correct. They complete the work and submit the work to the teacher. Teacher is able to see the answers the pupil has written. The exercises that have auto check feature, the teacher can see the correctness of the responses, is able to comment on the work. The answers that do not have a single correct answer, the teacher reads the answer that the pupil has provided and marks it as right or wrong or as neutral. If the teacher sees the need for the pupil to correct mistakes, the teacher sends back the work to the pupil. If the teacher considers the pupil’s performance adequate, the teacher selects the type of feedback that he/she wishes to provide to the pupil – per centage, score 1-5, formative assessment. Then publishes the result to the pupil.
Exercise stack is a selection of assessment exercises (questions or tasks) for each chapter that only the teacher can see. The pupil only sees these assessment exercises when the teacher assigns them. The teacher can also add their own exercises to the questions found in the bank. Most of the assessment bank exercises are partially or fully checked for correctness by the system. These are marked with a lightning arrow.
Study Kit
Each chapter of the study kit offers the following options.
Solving tasks in the chapter
Solve the exercises in the chapter, have them checked automatically or save the answers. The teacher does not see how the pupil has completed the exercises in the chapter section. The teacher can see the statistics of the pupils performance in the chapter section.
Each chapter in addition also has an exercise stack, but the pupil only sees exercises from it which the teacher has assigned them.
Highlighting and commenting on the textbook text
The user can interact with the text by adding notes, comments and multi coloured highlights. To do this, select the text with your mouse or your finger on your smart device and select the highlight colour or comment option from the menu that opens. Save your comments and highlighted sections. When you reopen the chapter, the highlighting and comments will be retained.

Showing textbook text on an external display, e.g., a projector or smart board
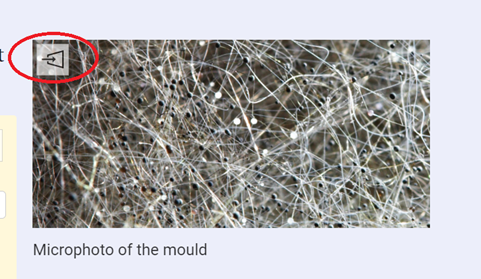
The teacher can show the chapter texts, exercises, images, videos, animations on an external display, e.g., a projector or smart board. To do this, the images and videos included in the chapter and in the exercise stack can be opened in a new window, which can be dragged to another screen to show them to the pupils. To open a media file on the external display, click on the projector icon in the top corner of the image or video, or open the media file in the media gallery and click on the projector icon in the top left corner. To display multiple images contained in the chapter you can open the images as a media gallery, send it to the external display and then move between images in the media gallery. You will not need to repeat dragging for every image.
Adding files, links, or text to each section
You can add files or text to each section. To do this, click on the "Add own content" link. The material added by the teacher will be visible to the pupils in course.
Searching content that is related to a section
There is a "More like this" link for each section. Clicking on this link will search for material related to the content of that section from earlier and later materials in the same subject, as well as from other subjects. This allows the teacher to find exercises and materials of varying difficulty on the same topic to incorporate to meet the needs of different pupils abilities.
Copying a section link or reporting a mistake
At the end of each section, there is a link "More options" which offers two options:

- “Copy link” - the link to section will be available to paste as quick and direct reference to other teachers or to pupils.
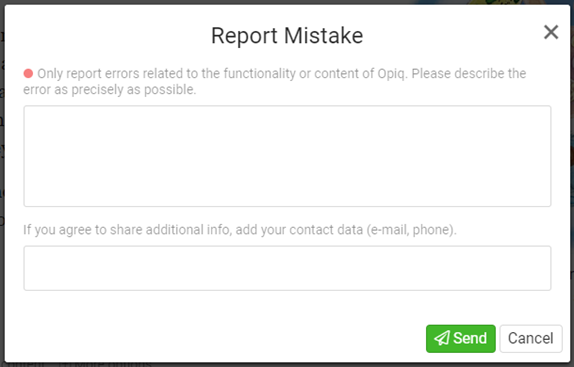
- “Report Mistake” - by reporting a mistake you can point out if you find any mistakes in the text. This way the editors of the text can fix the error.
Course
Course – course describes the combination of the study kits that the teacher uses to teach a subject in a specific class. If the teacher teaches the same subject in several streams, a separate course is created for each stream. A course is associated with one or more study kits. To create a course select from the library the study kit that you wish to use to teach.
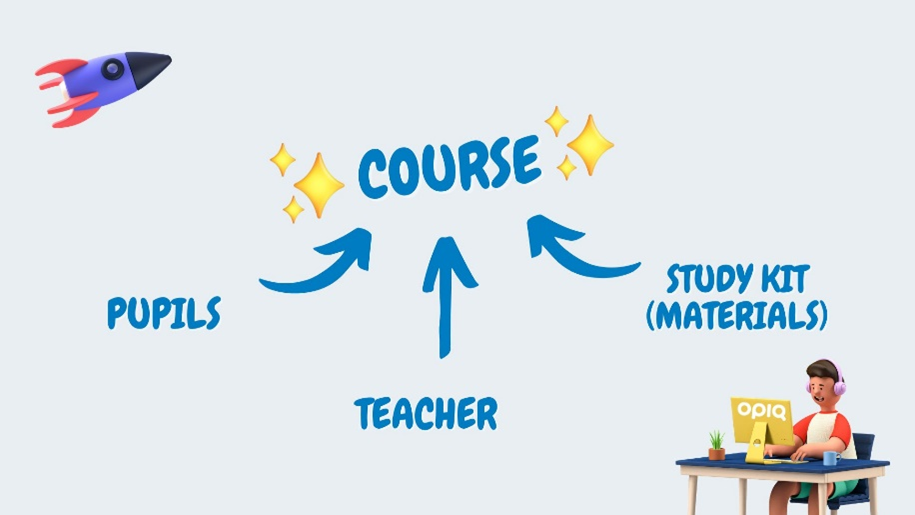
The study kit included in the course allows to:
- add pupils and teachers as users of the course;
- teacher to assign tasks and exercises to pupils and assess the same;
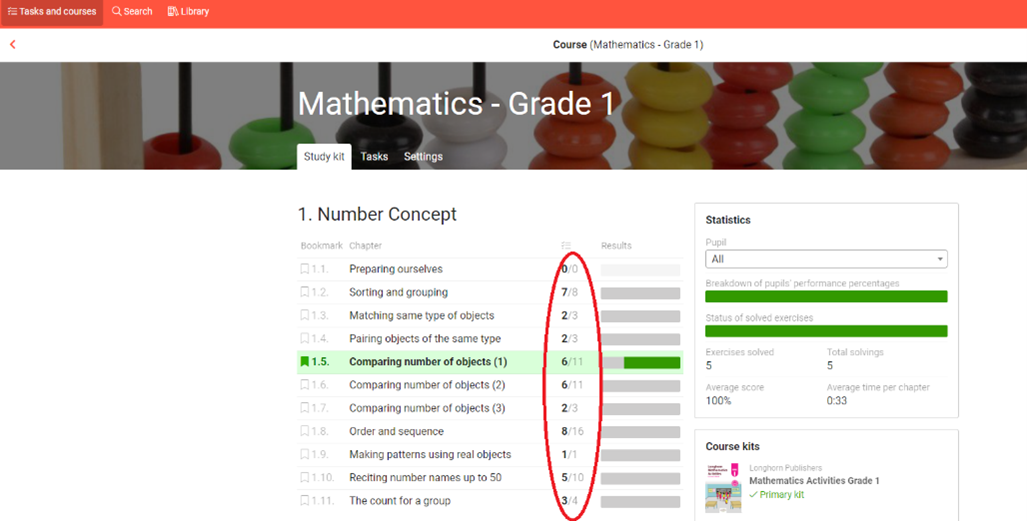
- Teacher can bookmark a chapter. Bookmark is placed by clicking the icon in front of the chapter number in a course created from study kit. Bookmark helps the teacher to define where the study progress is in any class. It helps pupils to find the place where to revise from quickly from the dashboard.
- teachers and pupils to find the study kit(s) used in their lesson on the dashboard of Opiq - textbook chapters, teacher-assigned tasks and teacher feedback (including competency assessments);
- add your own material (including tasks, exercises, assessments) to the study kit to share with pupils.
- use a learning sequence that allows the teacher and the pupils to quickly find the right chapter and content from the Opiq dashboard.
Several study kits can be linked to a course!
Study kits where a pupil has been added to can be seen on pupils dashboard in bookmarks block. The bookmarks display shortcuts to the chapters that the teacher has set as the study sequence in the courses.
Creating a course
Courses can be created by the school administrator or teacher. There are two ways for the teacher to add a course:
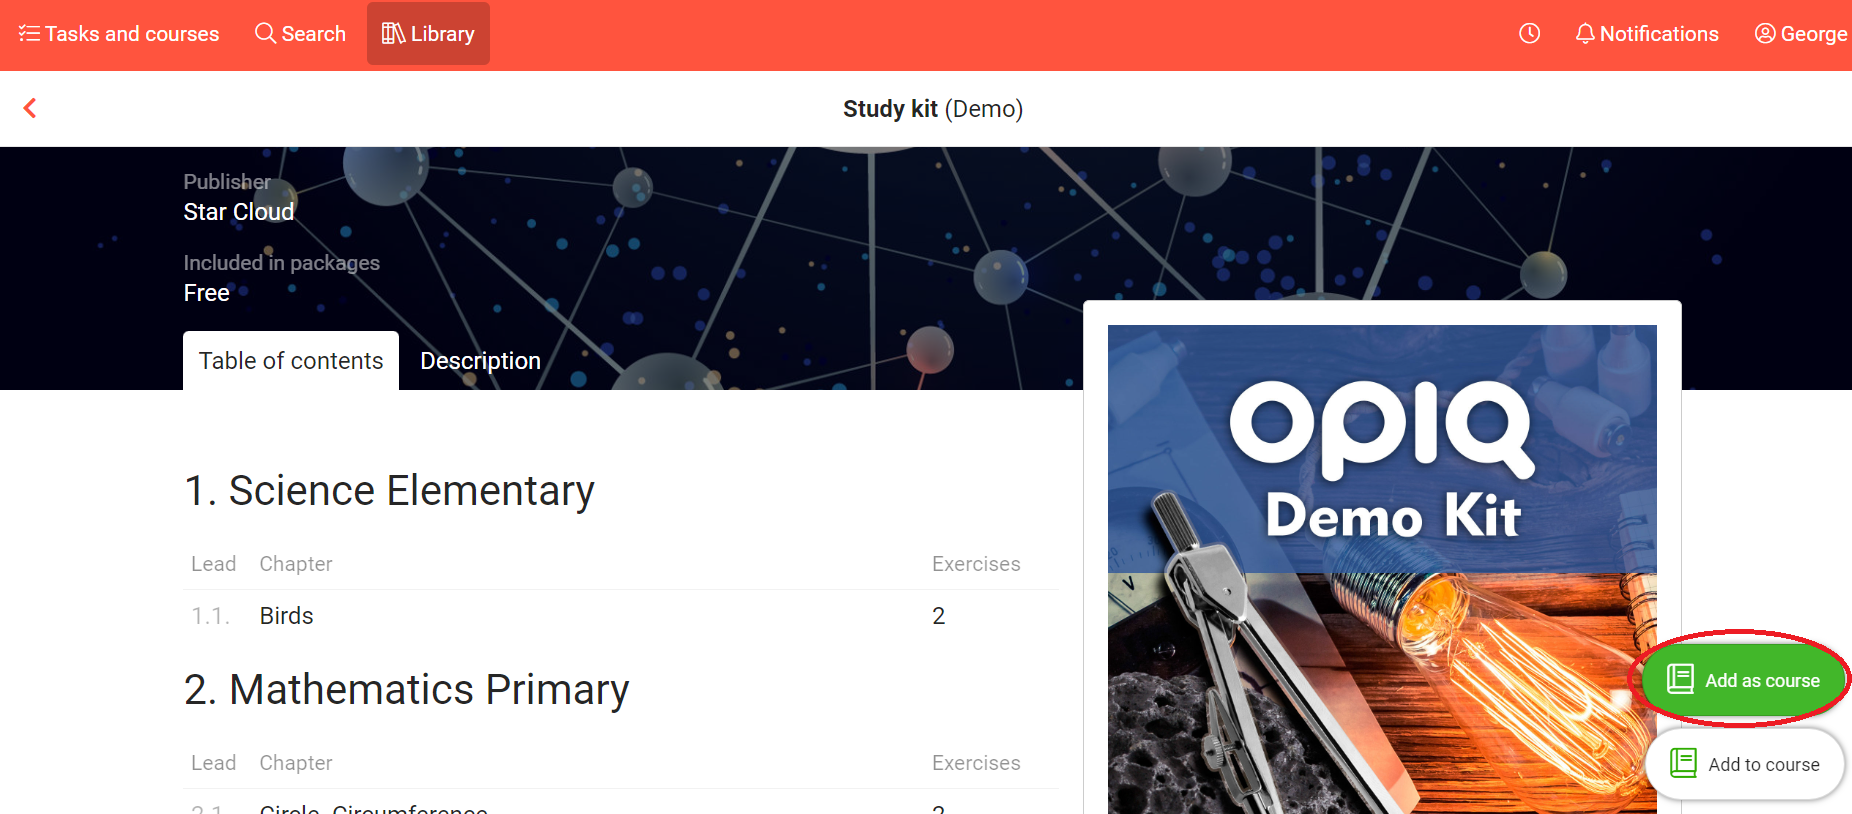
- Option A. Choose a study kit from the Library and click "Add as a course" button.
- Option B. Click "Add Opiq course" button on Course page.
Adding a course in Opiq
Option A
- Click on "Library" in the top menu bar;
- Select the needed study kit, click on the picture of the textbook;
- A view of the contents of the study kit opens, click on the green "Add as course" button;
- A window will open, name the course, and click on the "Add study kit as a course" button.
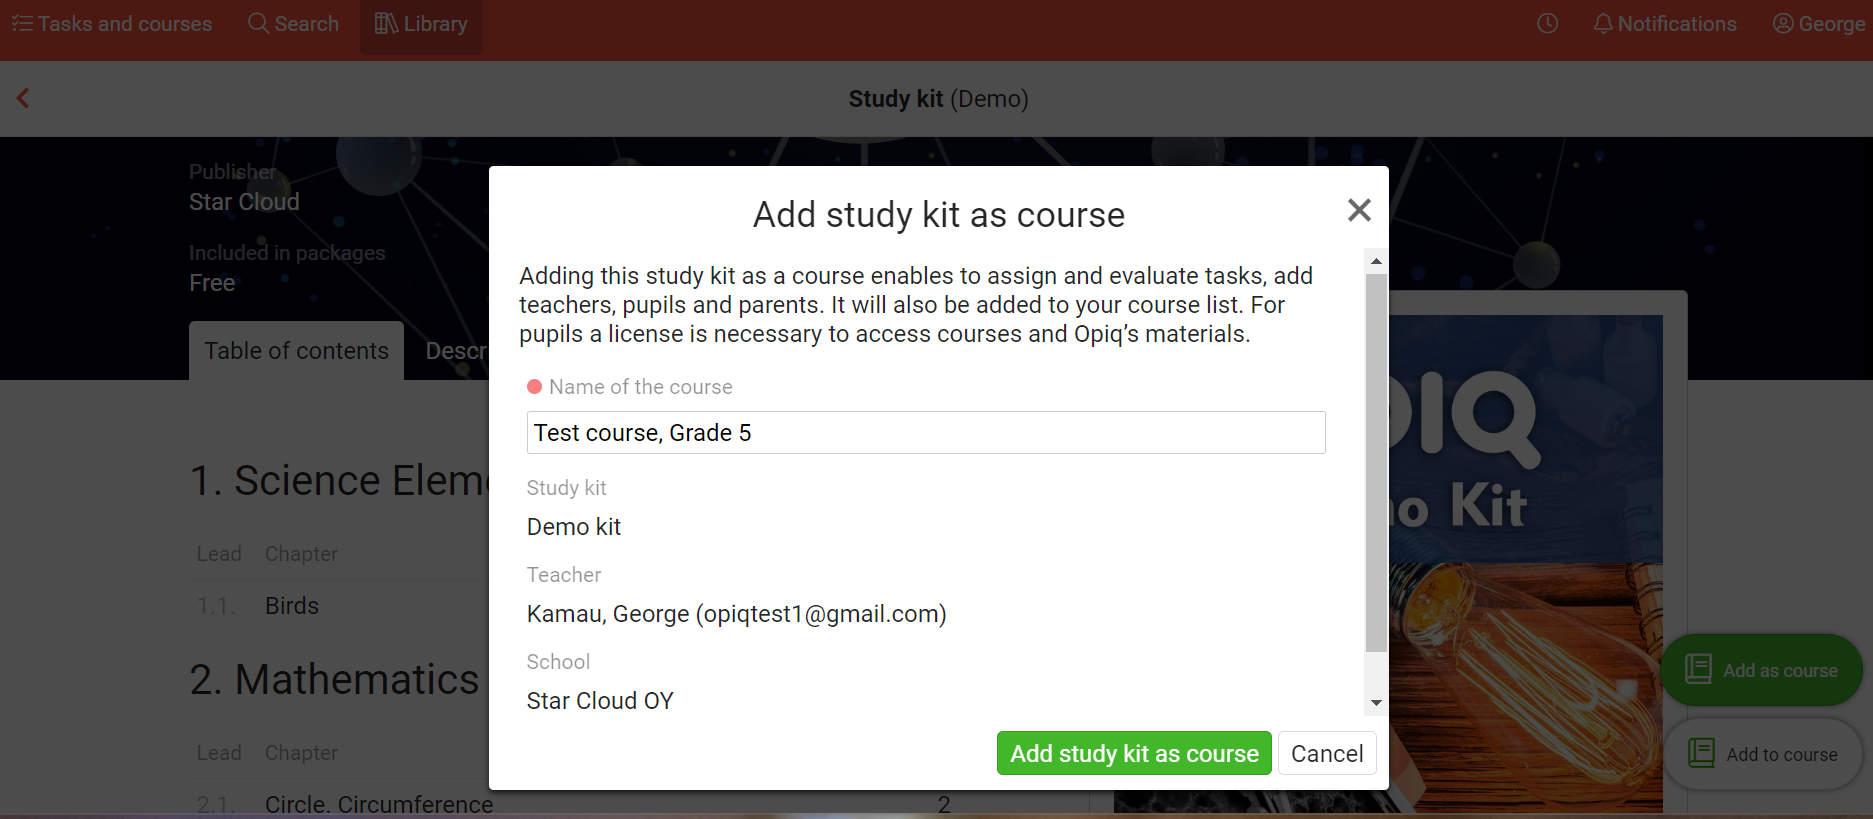 After you have created the course, you will find the course on your dashboard and on the courses page, where you can add teachers and pupils to your course. See here, how to add pupils to the course.
If you teach same subject in several classes, add one course for each stream, differentiating them, e.g. English 4 Blue, English 4 Green.
Option B
- Click on “More options” under the courses on the teacher's dashboard view;
- The “Courses” view opens, click on "Add course";
- Click on "Add Opiq course".

- The course adding page opens, where you can enter a name for the course.
- Select the study kit to which the course is linked from the drop-down menu and click on the name of the digital course.

- Check that your name is automatically displayed as a teacher. You can add other teachers to a course. If the teacher you want to add does not already have an Opiq account, they will receive an email invitation to join Opiq. If an account already exists, no invitation will be sent.
- Click the "Save" button.
- Next, Opiq creates a course and opens the course page.
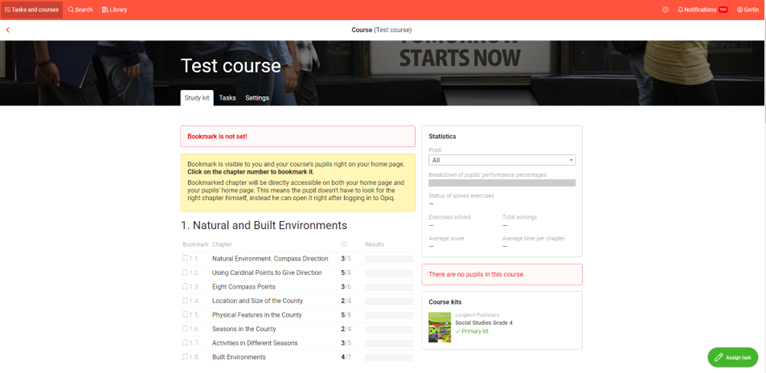
In the block "Study kit" you can see the study materials related to the course. If you wish to use other study kits in this course, you must add them by clicking on the "Settings" and then “Add kit” buttons. In the block “Tasks” you can see statistics and the progress of the tasks you have assigned to pupils.
Adding pupils to the course
To add pupils to the created course, click on the "Add or edit pupils" button in the course settings view. Many pupils can be conveniently added at once via the "Import pupils" button.
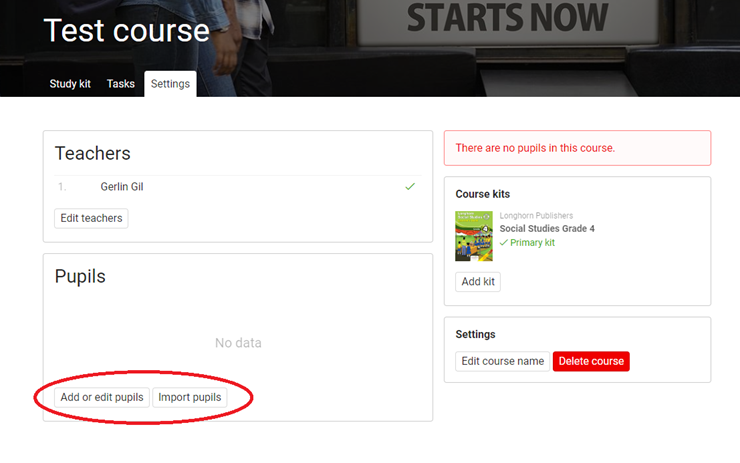
Clicking on "Add or edit pupils" will open the Add pupils view.
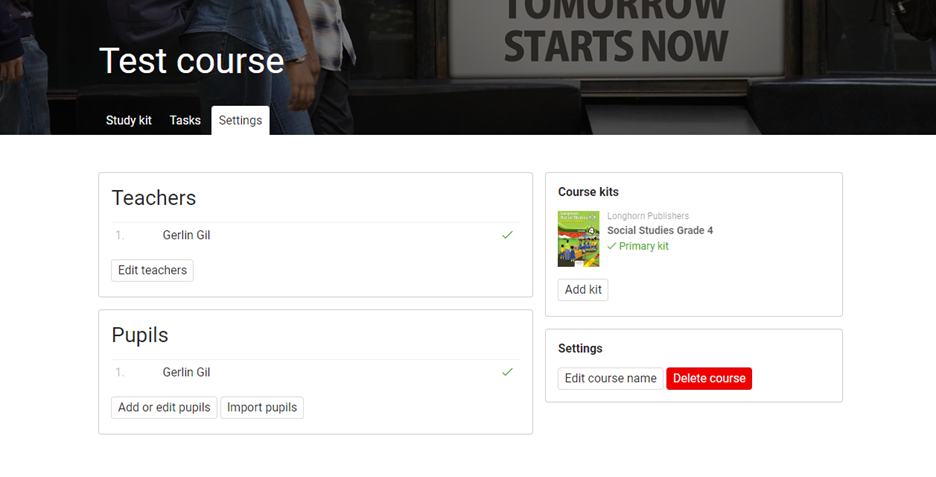
On the "Import pupils" page, you can enter pupils one by one or select them from existing or archived courses or classes. Pupils who do not yet have an Opiq account will receive an email invitation to join Opiq. If the pupil already has an Opiq account, the invitation is not sent and the course will be visible among his/her other courses.
Adding a pupil's role to a teacher account
Teachers can create a course in Opiq where they are both teacher and pupil at the same time. When a teacher adds him/herself as a pupil in the course, the teacher automatically becomes a pupil. This allows the teacher to log into Opiq as a pupil and experiment with, for example, sending himself/herself homework.
- Start adding a course.
- Once the course is created, to add yourself as a pupil in the course, click on the "Add or edit pupils" button in the course settings.
- The Add pupils view opens. Enter your details in the list of pupils and click "Add users".
- After adding a teacher as a pupil in the course, you will automatically be assigned the role of pupil in Opiq. In the course settings, you will see the teacher's name as both teacher and pupil.

Switching to pupil role
To use Opiq as a pupil, do the following:
- Click on your name in the top menu bar.
- Click on the link "Change role"
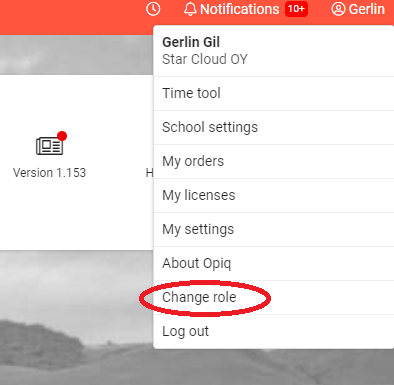
- A window will open showing which roles are associated with your user account. Click on the "Pupil" link.
- You will be presented with the Opiq platform in pupil view.
Task assignment
Opiq study kits consist of chapters and exercise stack. The pupils do not see the exercises from a stack, they only see exercises in the study text (in chapters) and the assignments that the teacher has assigned to them from an exercise stack.
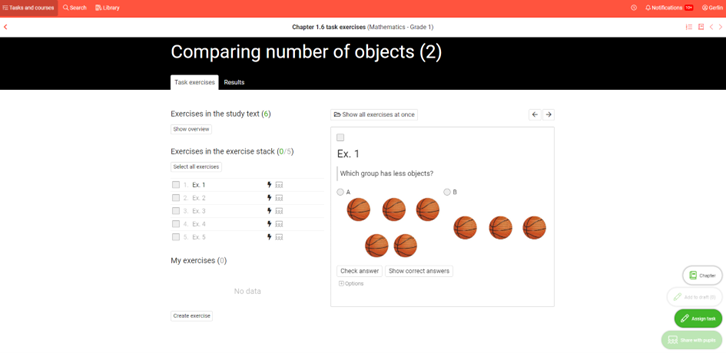
Assigning task
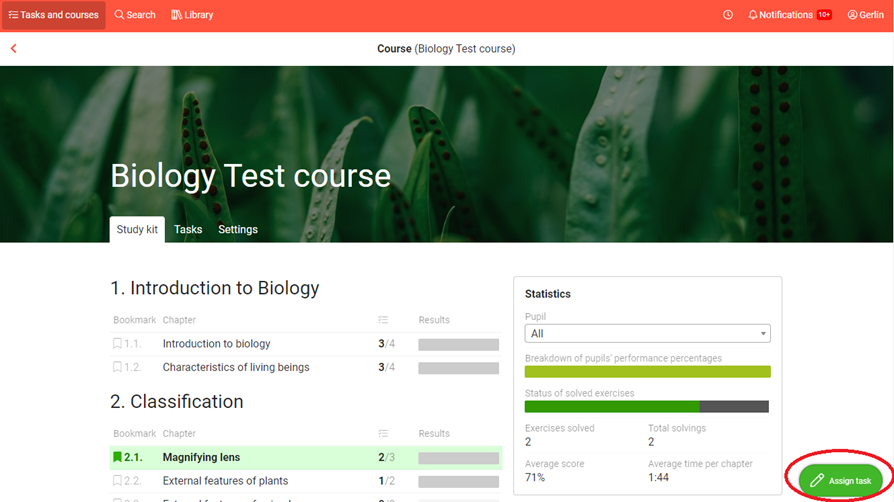
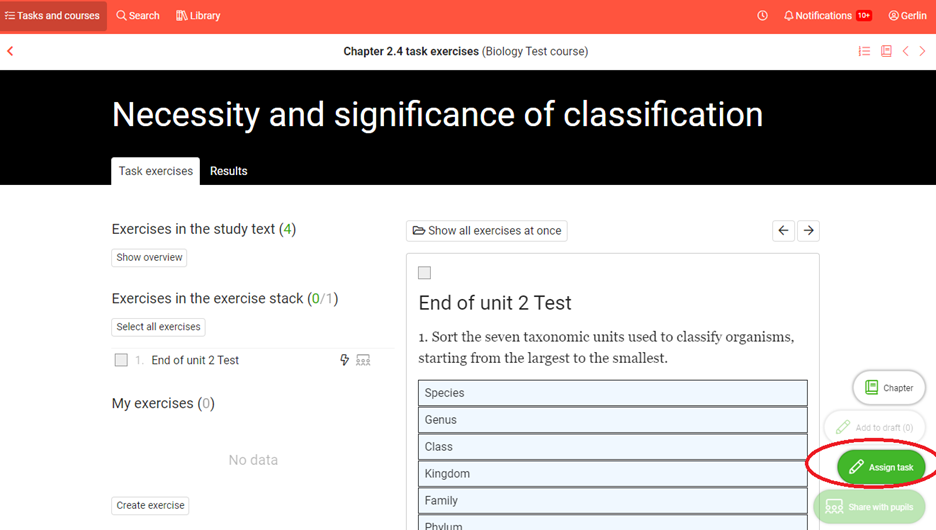
To assign a task, click on the green "Assign task" button. The "Assign task” button can be found in several different places:
- on the dashboard of the teacher's courses;

- the list of contents in the course;
- from excersise stack per chapter of the study kit.
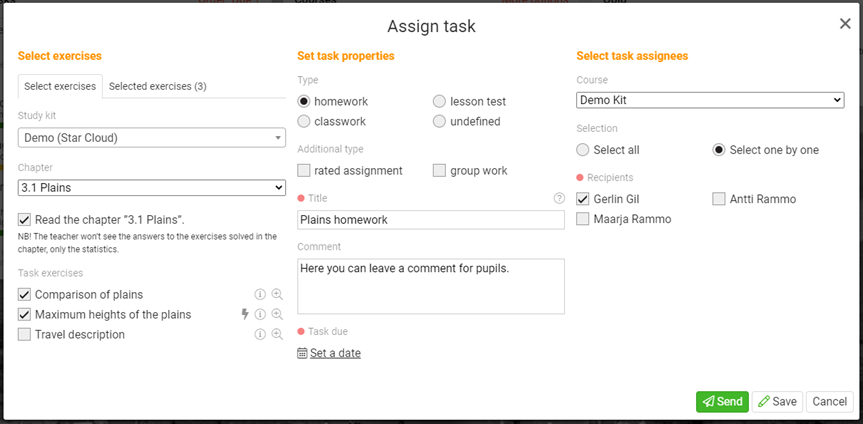
Clicking on the "Assign task" button opens a window where you can choose which tasks to assign to whom and by when.
Select exercises
In this block, you can select which tasks to assign to pupils.
You can select exercises from all study kits. When a teacher starts assigning a task from a course, the list of exercises will start with the course study kit and then all the other teaching sets belonging to the packages for which the teacher has a license.
The work assigned by the teacher can contain up to 50 tasks. A lightning arrow after the task title indicates an auto-check exercise, hovering the mouse over the information icon shows a description of the exercise and clicking on the magnifier icon opens the exercise in a new window.
To select a task, tick the box in front of it. You can see all the selected tasks by clicking on the "Selected exercises" tab.
Set task properties
In this block you can specify the type of work, add title, description and deadline.
Select task assignees
In this block you can select which pupils to assign the assignment to. The teacher can edit the course and choose how many pupils the assignment will be sent to. The assignment will be sent to the pupils whose name is ticked in the box in front of the assignment.
Once the teacher has clicked on the green "Send" button, the work is sent to the pupils.
In addition, you can save your work by clicking on the "Save" button. Saved work can be seen on the teacher's dashboard in the left-hand tasks block next to the sent work.
Once the work has been sent by the teacher, you will see the work on your dashboard in the sent tasks block and on the tasks page of your course.
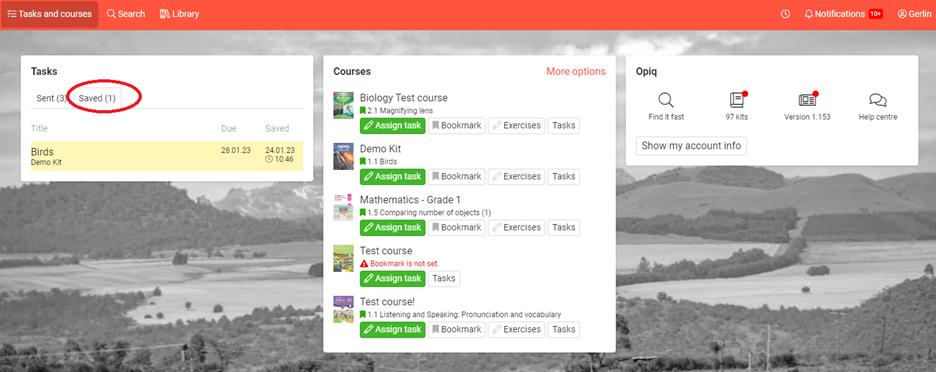
The pupil sees the tasks assigned to him/her:
- on their dashboard in the tasks section;
- on the course tasks page.
Read the pupil's user guide to find out how to solve the assigned task (from here).
Giving feedback on submitted tasks
The teacher can see on his/her dashboard, in the sent tasks block and on the tasks page of the course, the tasks assigned and, on the scale after it, the distribution of the tasks: how much work has been submitted, how much has been evaluated and with what marks.
Clicking on the title of the task opens the task overview page, where you can see all the pupils who have received the task, information on whether the assignment has been submitted to the teacher, and statistics on the tasks.
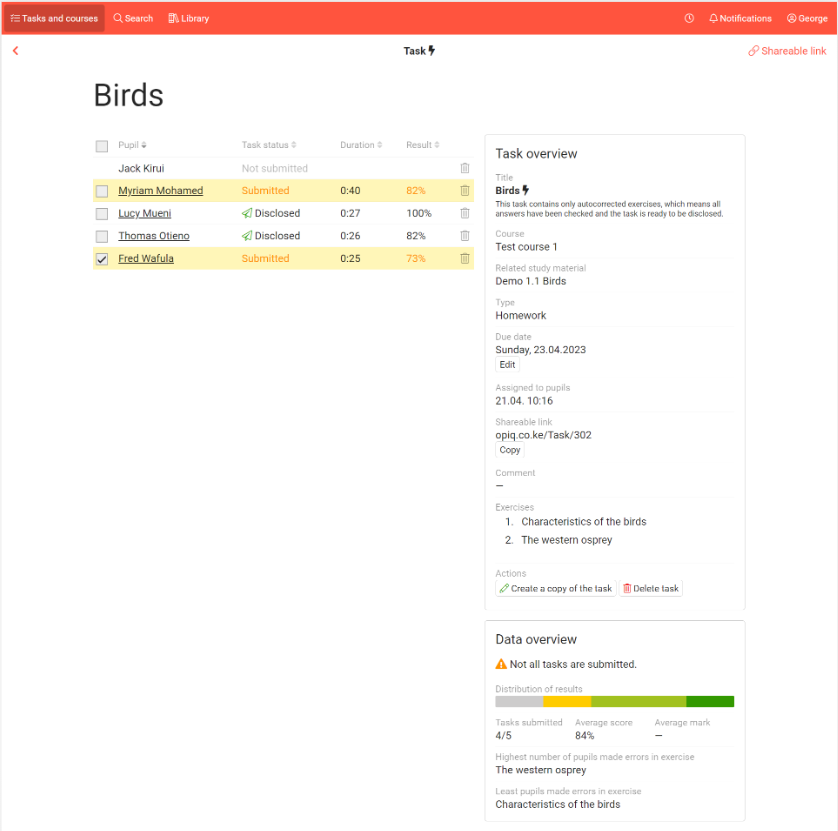
If the assignment is made up of auto check exercises, the teacher does not necessarily need to review the pupils' work. Opiq calculates the percentage of the pupil's work that is correct and displays it in the “Result” column. If there are tasks in the work that cannot be automatically checked, a safety triangle will be displayed with a message to that effect.
In the case of auto check exercises, the teacher can simply tick the boxes in front of the pupils' names and press the "Disclose selected" button.
There is a "Send back" button next to the "Disclose selected" button. When clicked, the selected work is sent back to the pupils. The pupil's answers and the teacher's own comments will remain in the work, while the attached files and the marks given to the work will be deleted. The returned work can be edited and resubmitted by the pupil. If the pupil resubmits the work, the teacher should decide, when checking and marking the work, whether the comments he or she has previously added are still relevant or whether they should now be deleted before the result is published.
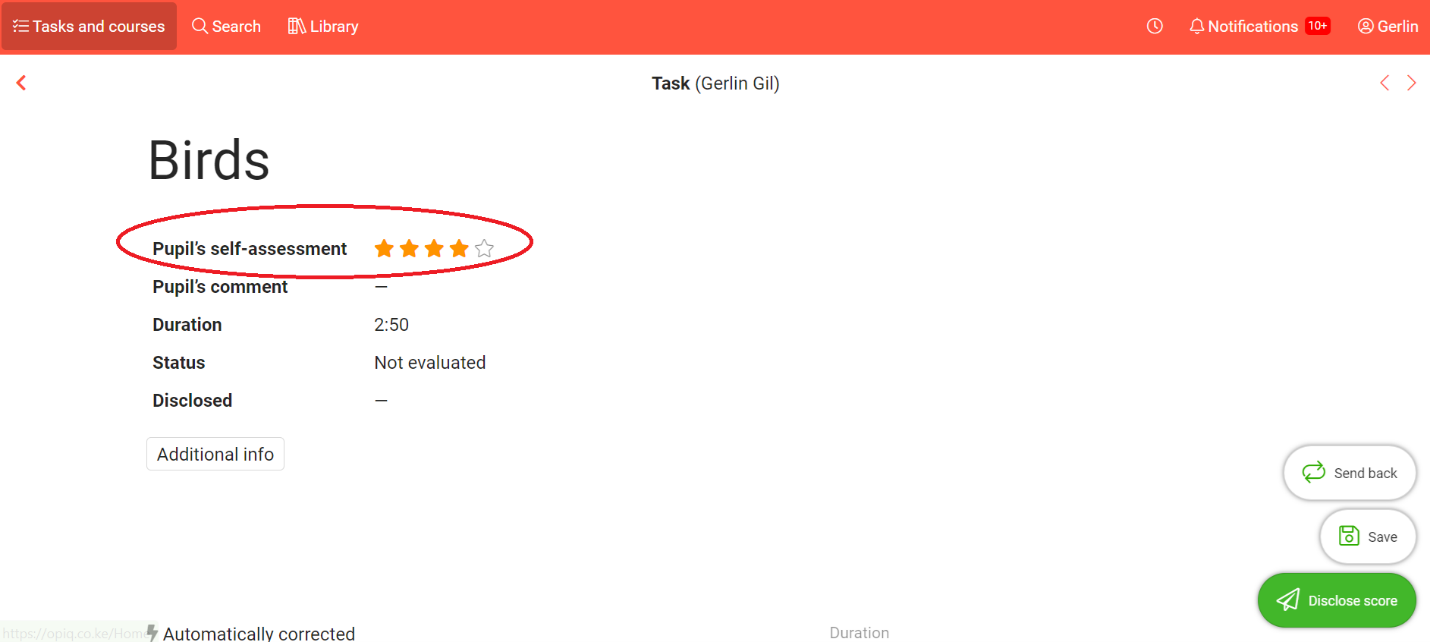
Clicking on the pupil's name opens the assessment view.
The teacher can see how the pupil has rated his/her work in the five-star system.
The teacher can see which answers are right and which are wrong in the auto check exercises. If the task is not auto check exercise, the teacher has to decide which answers are correct, which are incorrect and which are not evaluated. To do so, click on the pupils' answer and select if the answer is correct or wrong.
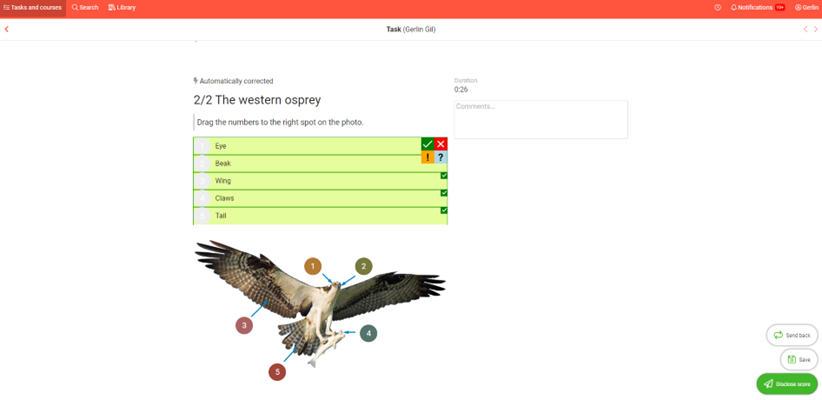
✓ – correct answer; x – wrong answer; ! – unverified answer; ? – answer not evaluated
While doing the tasks, the pupil can indicate the level of difficulty he/she thinks the task is. There are three options to choose from - easy, average, difficult. The teacher can see the level of difficulty selected by the pupil in the task view.

At the end of the page there is an overview of the assignment and a feedback block.
Types of feedback
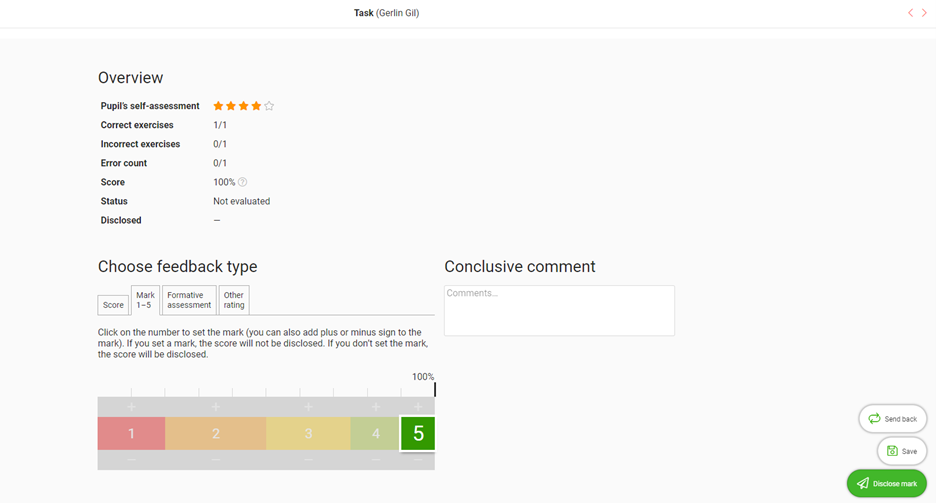
- Mark 1-5 – allows you to enter a score on a scale of 1–5 and add +/- to it.
- Score – shows the percentage of correct answers out of the total number of correct and incorrect answers. Calculated automatically.
- Formative assessment – the teacher writes a comment on the work in a summary comment box.
- Other grade – option to enter another grade, e.g. A, B, C.
The teacher can then click on "Disclose mark " to send the assignment with the result to the pupil immediately, or click on "Save" to save the feedback given but not send the assignment to the pupil at this time. The work can also be published afterwards on the task review page. Once the task has been published, the teacher can still edit the feedback afterwards and republish it if needed.
Once the teacher has published the result of the pupil's assignment, a notification appears on the pupil's Opiq dashboard and the feedback can be found in tasks block under the "rated" tasks. The pupil can click on the title of the work to open it and see the results.
Search
The quickest and most efficient way to find study kits is to use the search. You can access the search page by clicking on the top menu bar. The teacher can search from the textbook chapters of all the Opiq library study kits.
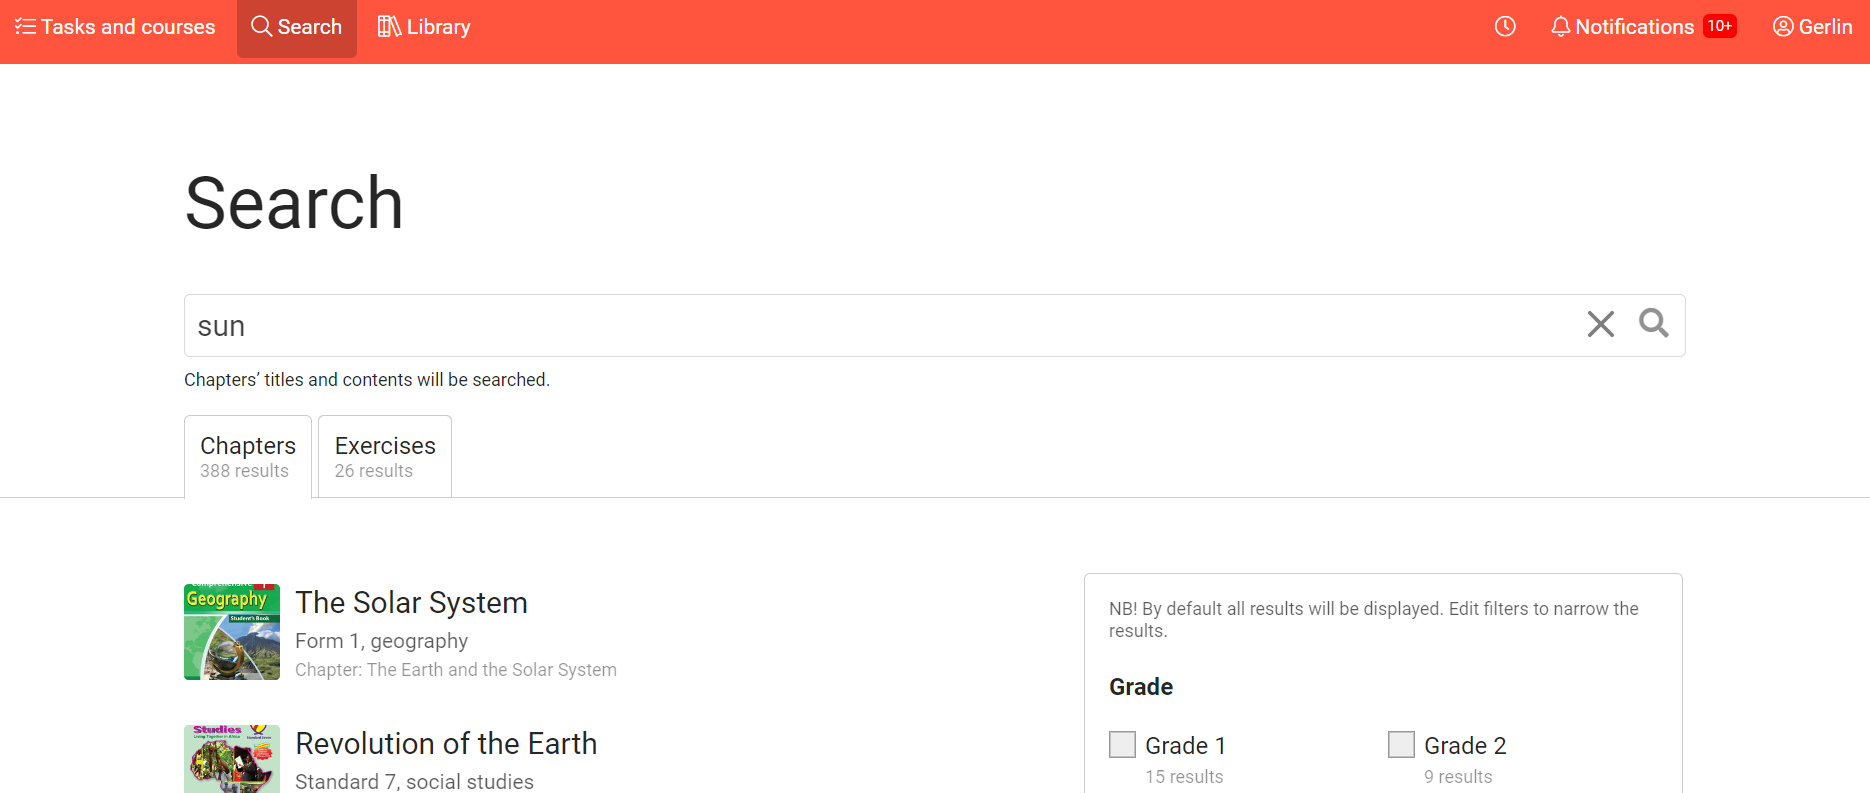
Chapter search
The content of all chapters of all textbooks in the Opiq library, including the tasks in the chapter, are searched. Search results are displayed with section precision. After all search results have been found, the results can be narrowed down using the grade and subject filters.
Exercises search
Searched from all sets of exercises in all sets and from tasks created by the teacher. After all search results have been found, the results can be narrowed down using properties, grade and subject filters.
Library search
Search the tables of contents and descriptions of all the study kits in the Opiq library. If no search term is entered, all the works in the library are displayed. Results can be filtered by grade, subject, publisher, package and language of the material.
Settings
The teacher can click on their name in the top right-hand bar to open a settings menu with different options.
The options available under the "My settings" link are:
- Change password
- Change username
- Choose your language
- Browser Automatic Translation
- Connections with external user accounts
- Sending notifications
- Private user role
- My orders
- My licenses
Licenses
To use Opiq the user must have a license. The license gives the pupil access to all the textbooks in the Opiq Library that are part of a specific package.
Pupil licenses
Paid licenses can be ordered by the pupil and the school administrator. The license gives the pupil access to digital textbooks belonging to a specific Opiq package. Read more here.
Find out how your school administrator can order a license.
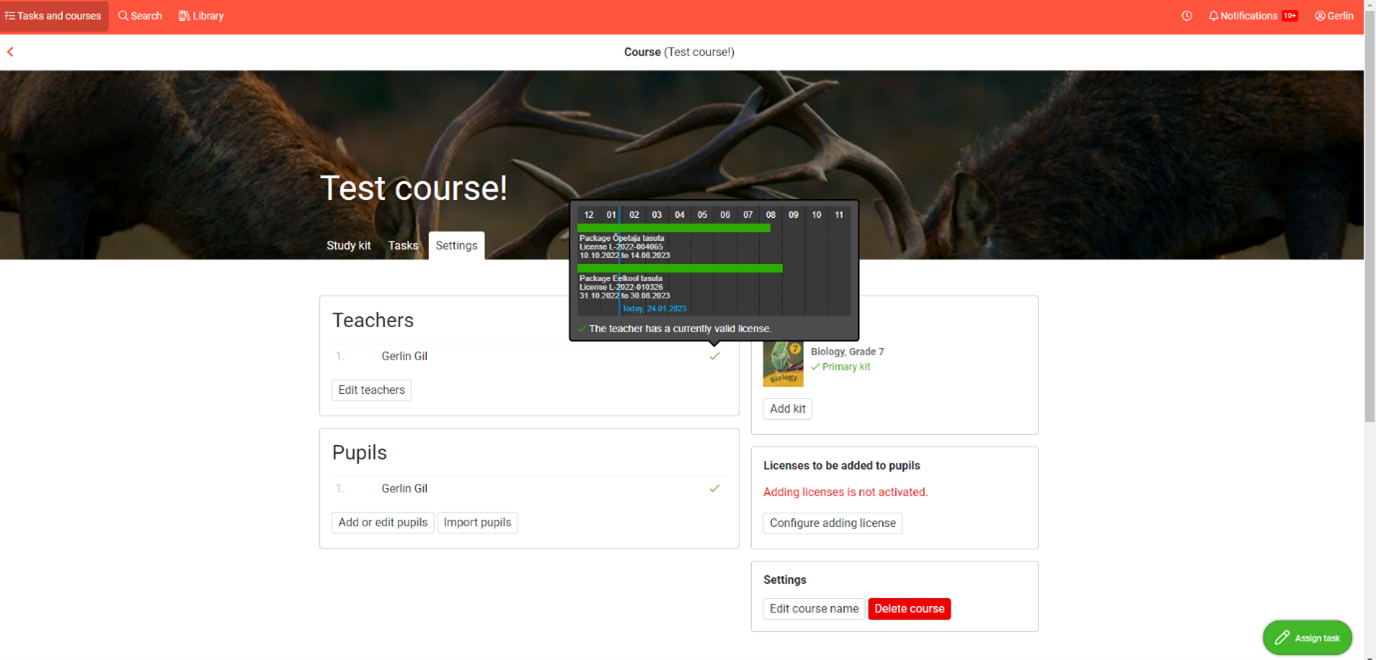
The teacher can see information about the existence and validity of pupils' licenses in the settings page of the course. The icon displayed shows the license information for the selected learning package in the course.
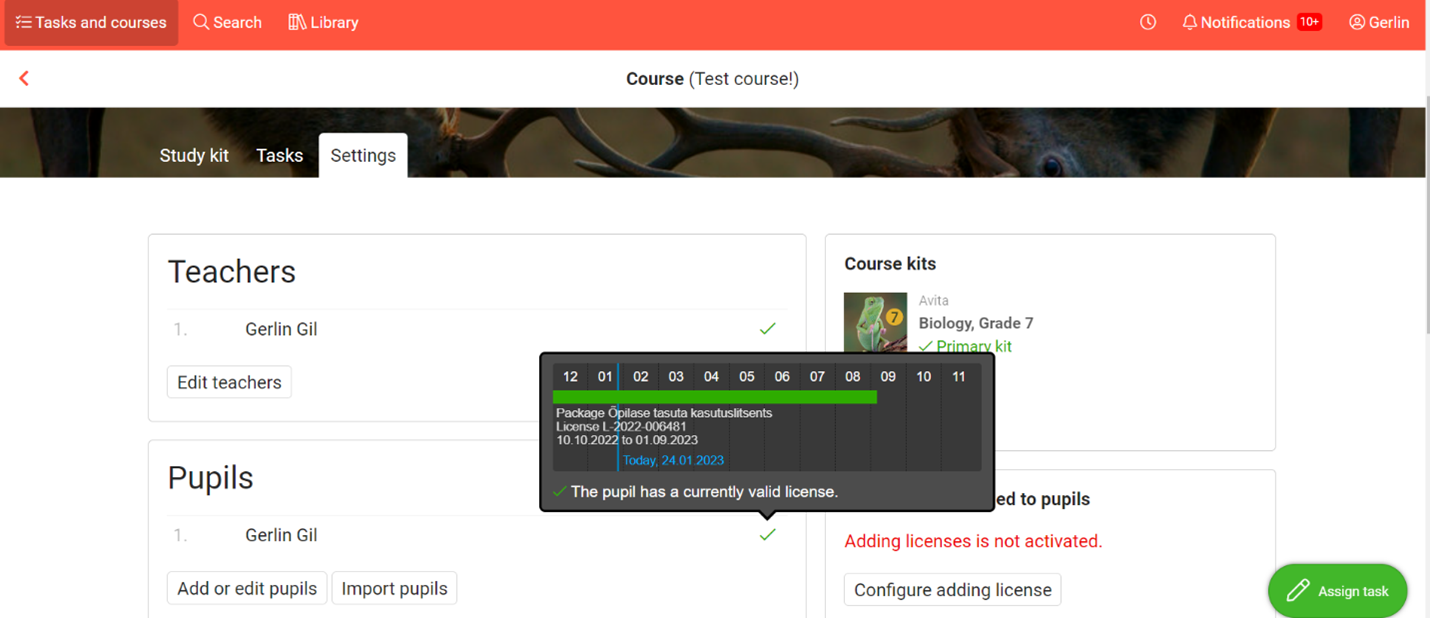
If a pupil is included in the course who does not have a valid license, a warning will be displayed to the teacher on the teacher's dashboard as well as on the course's content and settings page. The school administrator will also be informed on his/her dashboard.
Teacher licenses
Teachers can use Opiq for their lessons if the school has ordered a teacher license and added it to the teacher's Opiq account. A teacher can see his/her license information if he/she has added himself/herself as a teacher in a course and opens the settings page of that course. In the teachers block, there is an icon after the name which displays the license information for the selected teaching package in the course, and information about the licenses for all packages can be seen by moving the mouse over the icon.
Additional information
Additional information can be requested by writing to info@opiq.co.ke or by calling +254 205 148 194 (Mon-Fri from 9:00 am to 5:00 pm). Also, check announcements on our Facebook page.
