Teachers and pupils can use digital textbooks through the school's Opiq account, which is managed by an administrator in each school. Schools can purchase licenses based on the number of pupils with information found here.
You can find an overview of digital study kits in Opiq's library.
Additional information can be requested by writing to info@opiq.co.ke or by calling +254 205 148 194 (Mon-Fri from 9:00 am to 5:00 pm). Also, check announcements on our Facebook page.
How can a school start using Opiq?
For teachers and pupils to be able to join Opiq and start using the study materials, the educational institution must create an Opiq school account.
To create a school account, the school representative (principal, headmaster) sends a request to the address info@opiq.co.ke. The name of the school and the details of the school administrator (first and last name, email address, phone number) must be added to the application.
The main roles of a school administrator are:
- Creating Opiq access for teachers and pupils;
- Ordering study material licenses for the school;
- Adding licenses to teacher or pupil user accounts.
Based on the application of the school representative, the Opiq team creates an account for the school and adds the administrator as the first user.
The school administrator will receive an invitation to join Opiq by email. There is a link in the invitation, clicking on it will take the administrator to the page where he can set the password for his/her Opiq account (the email invitation is valid for seven days and can only be used once to set the password).
User administration
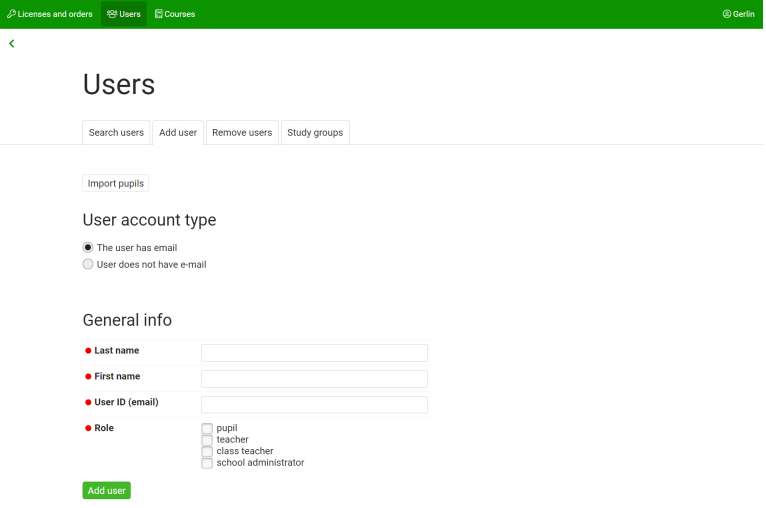
Adding a user
The school administrator has three options for adding users directly to Opiq.
- On the “Users” page there is an “Add user” tab. Here you can enter the data of the user to be added and choose in which role he can use Opiq.
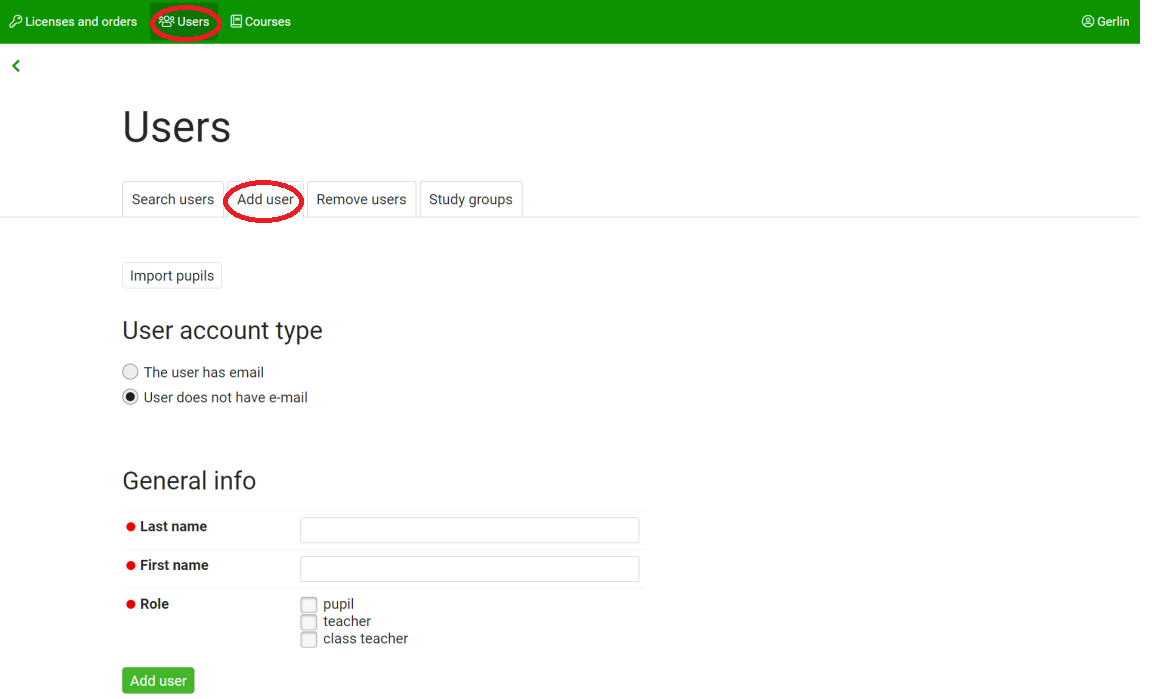
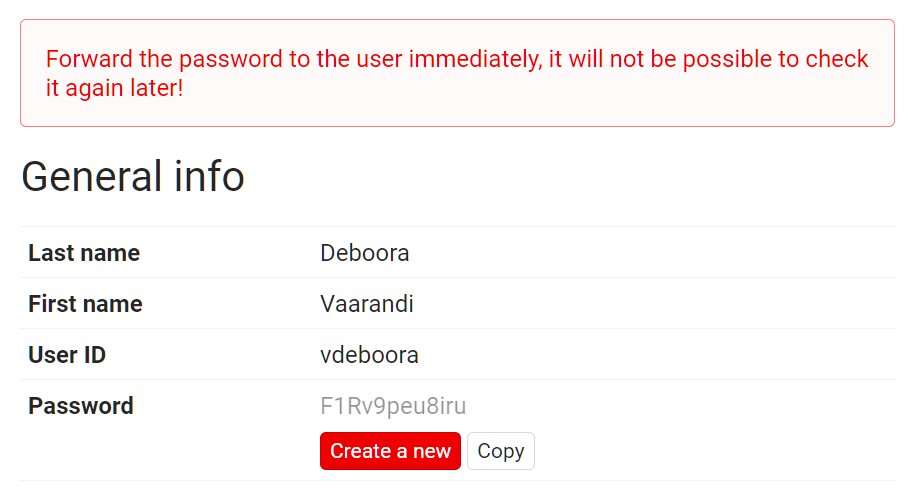
- NB! It is also an option to add the user without having an e-mail address. In this case it is important to forward (or write down) the userID and password immediately, since reviewing this later is impossible. If a new password is created, the previous one becomes invalid.
- NB! It is also an option to add the user without having an e-mail address. In this case it is important to forward (or write down) the userID and password immediately, since reviewing this later is impossible. If a new password is created, the previous one becomes invalid.
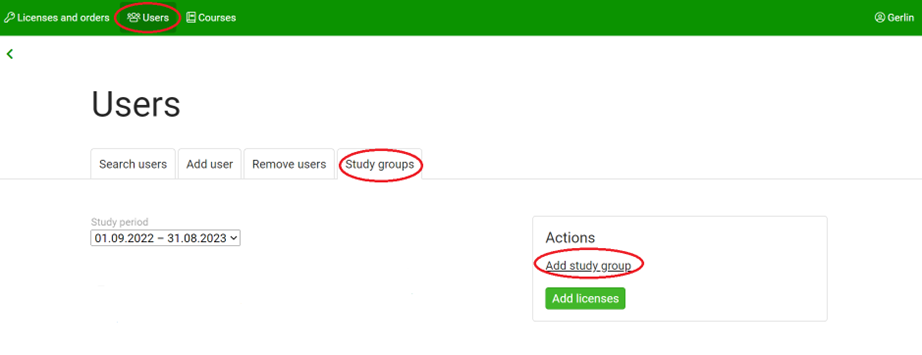
- On the “Users” page in the “Study groups” tab. By clicking on the “Add study group” button, you can add a study group to which teacher(s) and pupils can be added. Adding groups is not mandatory in Opiq, so it is more practical to add multiple users via courses (see the next point).
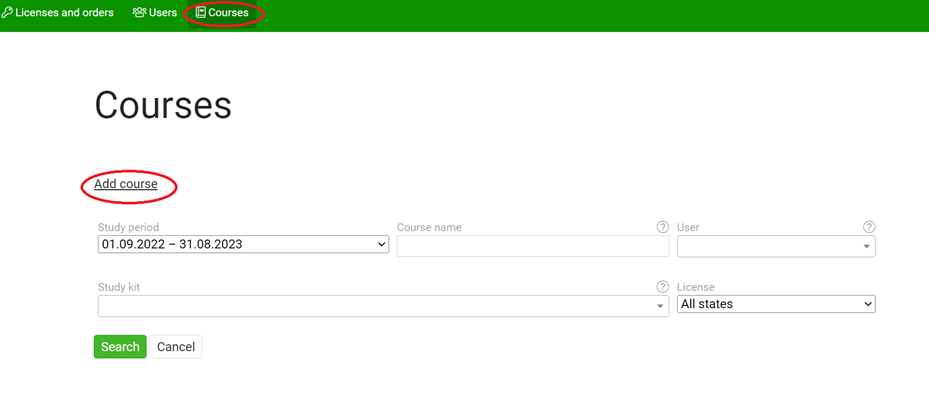
- On the page “Courses” there is a link “Add course”, by clicking you can create a course in which to add teacher(s) and pupils. The study kit, teacher and pupils come together in the course.
Note! When adding a user:
- with an e-mail address, a valid email address must be entered in the email field, as an invitation to join Opiq will be sent to it. The email address also becomes the user's username, which is used when logging into Opiq.
- If the school administrator adds a user who does not yet have an Opiq account, the user will receive an invitation via e-mail, in which, by clicking on the link, he/she can set a password and use it to log in to Opiq in the future. The invitation is valid for seven days. If the user has not opened the invitation and set a password within seven days, the school administrator must send the invitation again.
- without an e-mail address, when adding a user without an e-mail address (since there is nowhere to send an invitation), it is important to communicate (or write down) the username and password to the user immediately. Retriewing the password later is impossible. A new password can be created, an in this case the previous becomes invalid.
User info and its modification
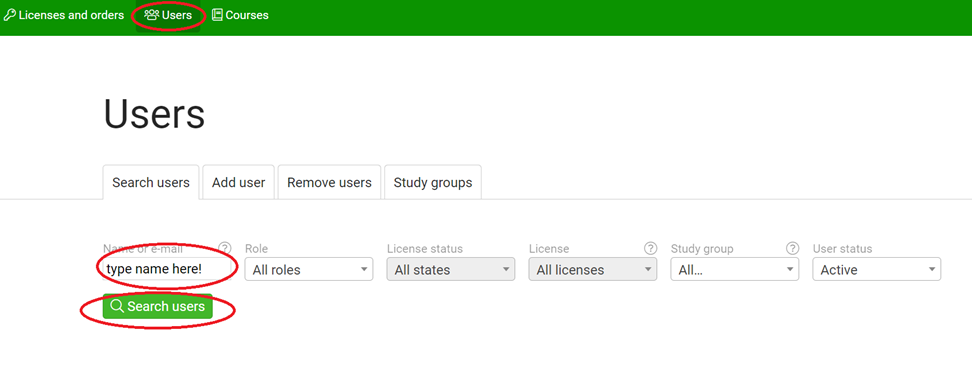
The school administrator can search for the specific user on the "Users" page. By clicking on his/her name in the search results, the administrator can open a detailed view of a person’s information, where his/her general data and information about licenses, classes and courses are displayed.
- "Resend invitation" button sends the invitation to the user again - this is necessary if the user invited to Opiq has not acted on the already sent invitation within seven days.
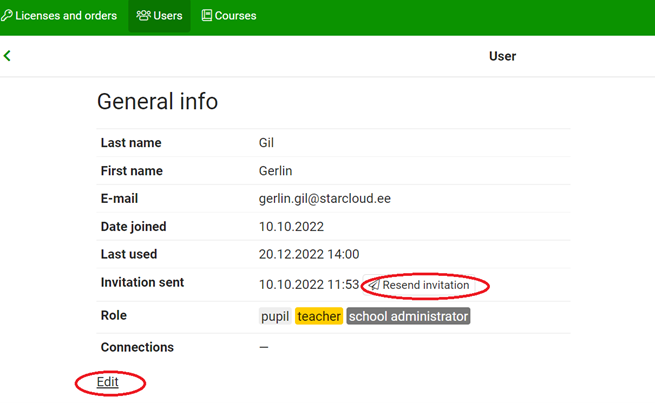
- You can change the user's name and roles by clicking the "Edit" link in the user's general info.
Adding a parent account
The school administrator can also add a parent user account to a user with the pupil role. To do this, press the "Edit" button. Page opens where you have to enter the parent's information.
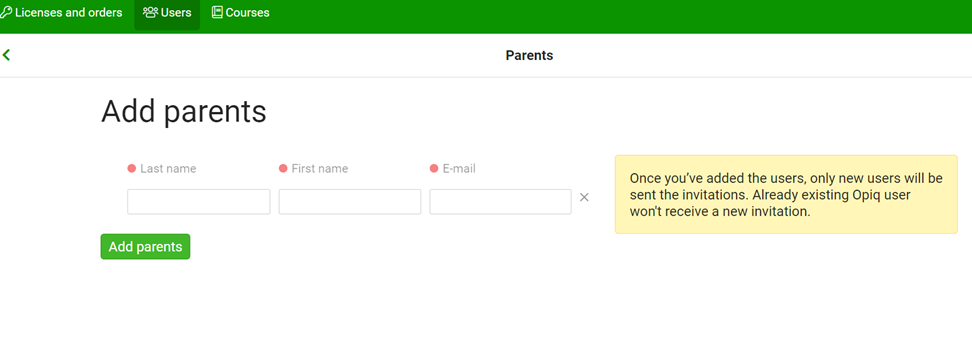
If the parent did not have an Opiq account previously, he/she will now receive an invitation to create one. When a pupil's parent logs in to Opiq, they see the same thing as their child in Opiq, however the parent cannot edit the child's work, submit it, save their answers in chapters, or mark chapters as completed.
The parent's account can also be added by the pupil on his/her settings page. See more about it here.
Removing a user
The user is removed by removing the role from him. Users can be removed individually or multiple users at once.
You can remove a user on their individual detail view page. To do this:
- on the "Users" page, find the desired user using the search;
- click on his name in the search results;
- click "Edit" in the general info page;
- remove the checkmark from the role that you want to remove from the user;
- press "Save".
To remove multiple users at once:
- On the "Users" page, click on the "Remove users" tab;
- use search to find necessary users;
- put a checkmark in front of the names of the users to be removed;
- select the role to be removed from them;
- press the button "Remove role from users".
Licenses
Ordering licenses
There are two ways to get Opiq licenses: either you place an order and pay the received invoice or activate a license code.
Place an order
Licenses can be ordered by the school administrator. To make an order, you must press the button "Place an order" on the home page or "Order license" on the “Place an order” page. On the opened page, you can choose the packages, their validity and quantity. The minimum order is license for one month.
When placing the order, you can choose whether the school pays for the licenses in one-time payment or in monthly payments. In the case of monthly payments, the school administrator must determine which date is the payment day.
Based on the confirmed order, Opiq (Star Cloud Ltd.) prepares an invoice for the school. The ordered licenses become valid when M-Pesa payment is transmitted or when bank transfer is confirmed (or at the beginning of the validity of the licenses).
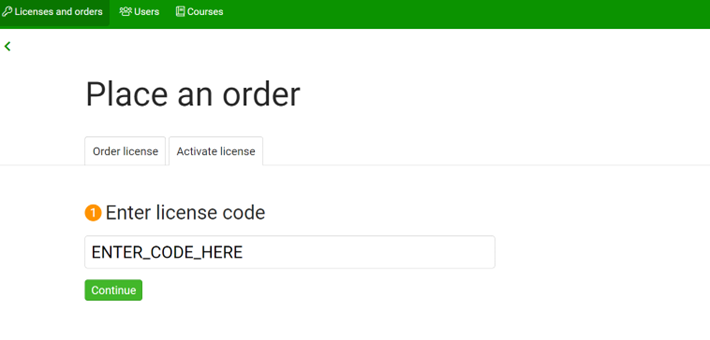
Activation of the license code
Licenses can also be obtained using a license code. In this case, on the “place an order” page, select "Activate license" and enter the license code received from Opiq. After activating the code, licenses can be added to users in the same way as after placing a regular order.
Adding licenses to users
After placing the license order or activating the license code, the school administrator must add the ordered licenses to the users. When a license is added to a pupil, he/she will have access to the study materials in Opiq library (except for the teachers’ books, which can only be seen by users in the role of school administrator or teacher). If a license is added to the teacher, he/she will have access to both the study kits and teachers’ tasks books.
To add licenses, you have to:
- find a block called “Licenses” on the front page. Click on “Add licenses to users” button;
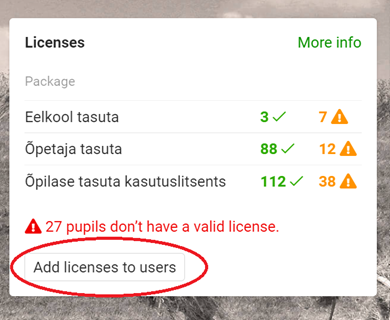
- search for users to add a license to;
- Put a checkmark in front of the users to whom the license should be added;
- choose which license to add from the menu;
- press the "License x users" button.
Removal of licenses
Already added licenses can be removed from users, and those same licenses can then be added to other, new users.
There are two ways to remove licenses from users.
- A. Licenses can be removed from general info page. For this you have to confirm your request to remove the selected license:
- on the "Users" page, find the required user with the search function;
- click on the name in the search results;
- press the cross in the "License info" block at the end of the license line that you want to remove.
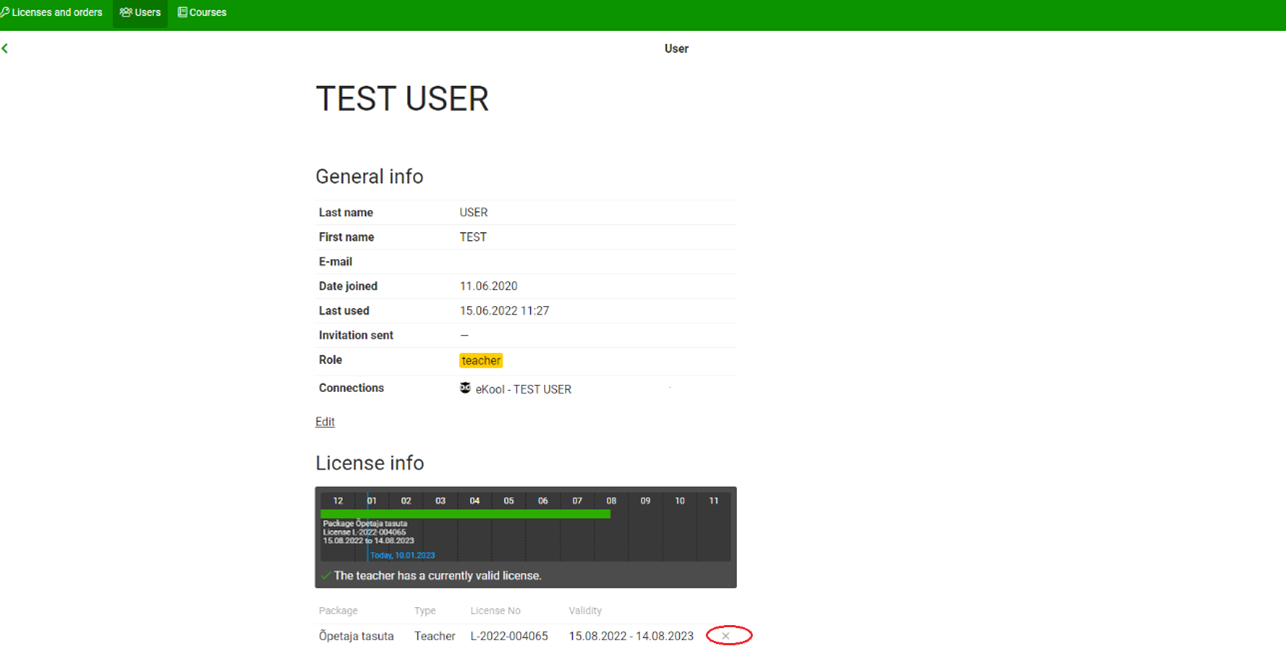
- Then you have to confirm your request to remove the selected license.
- B. To remove licenses from several users, you need to:
- From the home page licenses block click on “more info” which takes you to the “Licenses page”;
- on the "Licenses" page, click on the "Remove licenses" button;
- search for users to remove a license;
- tick the users from whom the license should be removed;
- choose which license to remove from the drop-down menu;
- press the button "Remove license from x users".
Course
What is a course?

Course describes the combination of the study kits that the teacher uses to teach a subject in a specific class. If the teacher teaches the same subject in several streams, a separate course is created for each stream. The teacher chooses from library a study kit and creates a course with it. The study kit will become an Opiq course, which brings together the study kit, pupils and the teacher(s).
Courses can be created by teachers and school administrators.
The course allows:
- add pupils and teachers as users of the course;
- the teacher to assign and assess pupils' work;
- teachers and pupils to find the learning material used in their lessons on the Opiq home page -- the textbook chapter, the teacher-assigned tasks and the teacher feedback (including grades);
- add your own material (including assignments) to the study kit to share with students;
- use a bookmark opportunity that allows the teacher and the pupils to quickly find the right chapter and content from the Opiq dashboard.
Several study kits can be linked to a course.
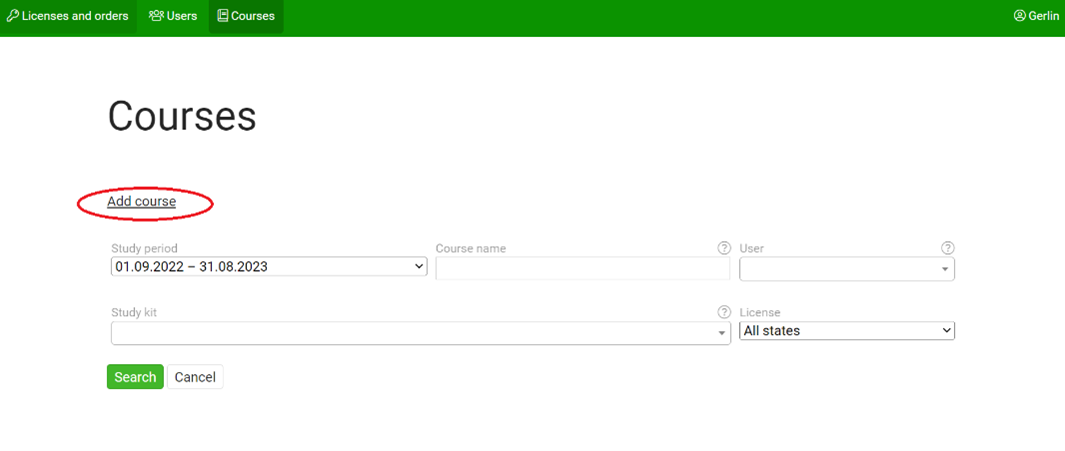
A school administrator can create a course in two ways:
- by clicking on the "Add course" link on the "Courses" page;
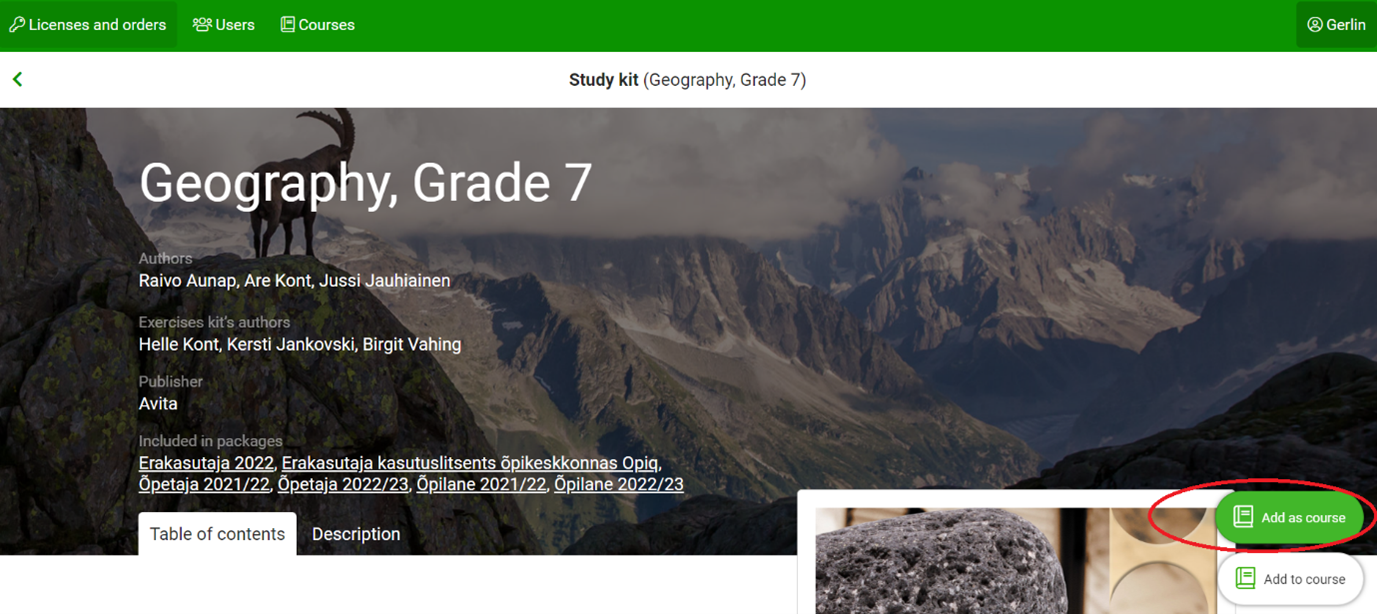
- by selecting a textbook to make a course in it by clicking the "Add as course" button.
On the "Courses" page, the school administrator can search through the courses created, and on each course page, he/she can see the teachers, the pupils, the status of the pupils' licenses, the curriculum set. You can also edit this information there.
Library
The school administrator has access to all the study kits in the Opiq library.

The study kit is a complete course for one subject and one grade, corresponding to paper version textbook and workbook set. Each Opiq study kit consists of chapters from the textbook and a set of tasks. The collection of tasks is a complementary set of exercises for each chapter, which are intended to be assigned to pupils (for classwork, homework, tests, etc.). It also contains methodological material and worksheets. The collection of exercise stack tasks is visible to teachers and school administrators, but not to pupils.
Additional information
Additional information can be requested by writing to info@opiq.co.ke or by calling +254 205 148 194 (Mon-Fri from 9:00 am to 5:00 pm). Also, check announcements on our Facebook page.
- Service provided by Star Cloud Ltd